As part of the book about cryptography, math and programming I’m writing, I’m encouraging readers to assemble their own paper Enigma machine. Since it’s pretty involved, I thought I’d write an illustrated blog post about doing it. I’m going to start with a summary of the context of the Enigma – and as a summary, I’ll gloss over some likely-important stuff, and also probably get some things a bit wrong. Corrections are welcome, of course. So, here we go!
First, the whole idea of making a paper replica of the Enigma came from the amazing Alan Turing, the British mathematician who is the topic of a decent movie, a great book, and is generally credited as being a pioneer of computers, artificial intelligence, and for shortening World War II by two years (and dare I say, perhaps keeping the Nazi’s from winning?) The story isn’t all rosy: he was also gay at a time in the U.K. when that was a punishable crime, and he eventually killed himself due to his treatment by the government. It wasn’t until 2013 that the Queen pardoned and thanked him for his service. As Martin Luther King Jr. said, “The arc of the moral universe is long, but it bends towards justice.” That’s certainly true in this case.
Thinking back to World War II, the German military was kicking butt all over Europe, and their submarines were causing all sorts of mayhem in the Atlantic. They were able to securely communicate across vast distances by sending radio messages that were encrypted with an Enigma machine. This meant that the Allies could hear their messages, but couldn’t understand them, because they didn’t have the key used to decode them. Polish mathematicians cracked the Enigma code in 1932, taking advantage of a subtle misconfiguration of how the Germans used the machines. By 1938, Germany fixed this flaw, and was able to send secure communications again.
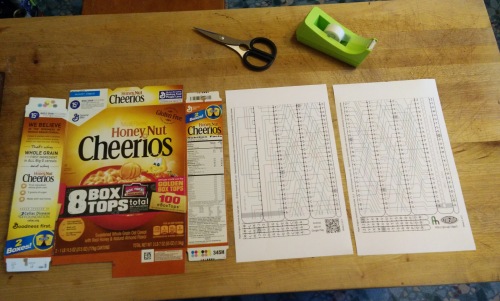
One of the first things Turing did at Bletchley Park was to create a model of the Enigma machine using comic strips. Our paper Enigma, from Franklin Heath (a security firm in the UK), was inspired by his work. The first thing you’ll need is the PDF of the paper Enigma. Since paper in the US isn’t the same shape as in the UK (A4), I had good luck printing it on legal sized paper (11×14 inches). The kit is designed to be wrapped around a cardboard tube that is 75mm in diameter. It turns out a Pringles potato chip can has this diameter (they’re called “crisp tubes” in Britain). I didn’t want to buy Pringles, so I used a cereal box. Here’s my setup before assembly:
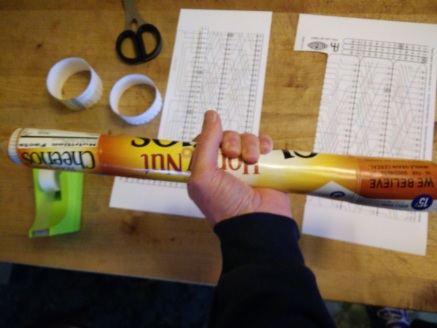
Cardboard usually has a way it “likes” to be curled, and one that it resists (creases rather than curls). For this box, the preferred curl is horizontal. So I cut off the tabs at the top and bottom of the box, and curled it by hand a few times, to get the cardboard roughly in the right shape:
Then cut out two of the strips (I chose the input/output strip and the Reflector B), and carefully tape them into bands, put the bands on both ends of the tube, and let it expand, like this:

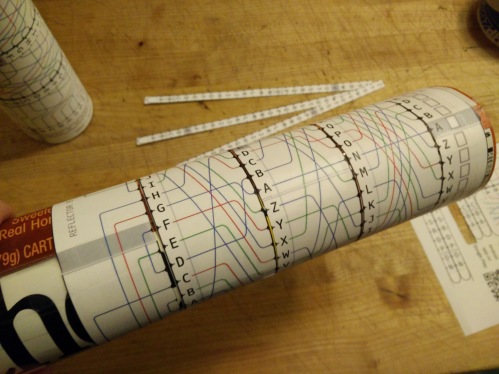
At this point, I put little tabs of tape inside the tube to help it hold its diameter, and fiddled with it until the bands were able to slide, but also didn’t have any slack. I tacked down the tube with a little tape, and pulled off the bands, then added a full-tube-length of packing tape to the outside-seam, like this:

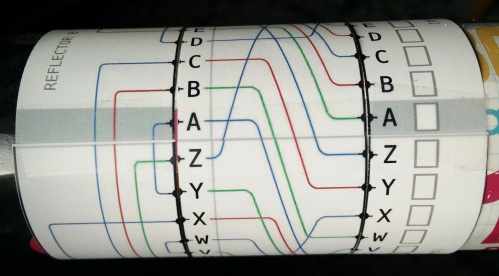
Finally, wrap the three “rotor” bands around the tube, and tape them, again checking that they can slide around the tube, without being too tight. With the three bands on, add the Input/Output and Reflector B band to the outside-ends of the tubes. Align the grey bars on these bands, and tape them to the tube: they stay put while the rotors move. When you’re done, from left to right, you’ll have the Reflector, Rotor I, Rotor II, Rotor III, then the I/O band. It should look something like this:
Using your paper Enigma
(borrowing heavily from the Franklin Heath wiki – I will rewrite this with my own examples once the book chapter is done)
You can test your basic Enigma now. The “rotor position” part of the key is the letters between the grey bars. In the setup above, the rotor key is FAN. The next aspect of the machine is that each time you encode a character, you first “advance” the rotor, by carefully twisting its band towards you by one letter. Let’s pretend that the key was FAM, and we rotated the right band to make the rotor position FAN. After doing that, take the letter you’re encoding, and locate it on the I/O band on the right, and trace the lines from right to left. In this case, it’s nearly a straight line: A -> N -> A -> G at this point, we’re at the “reflector”, so trace the line on the reflector to see where it leads. It should be W. From there, trace the line back to the I/O band. When I did this, I got W -> I -> S -> K. K is the encrypted version of A. To encrypt the next character, you advance the right ring towards you and repeat the procedure.
With what you know so far, you should be able to decrypt the following message, with the rotors initially set at A B C:
A E F A E J X X B N X Y J T Y
If you get that, the rest of the Enigma is just minor tweaks to that process. We’ll go through each of them, because you need to do them all in order to decrypt real Enigma messages (which we’ll do at the end).
Advancing the Rotors
As you advance the right-most ring, eventually you’ll come back to the original configuration. If the Enigma did nothing else, it would be not too different from the Vigenère cipher – not a bad cipher (it was used during the Civil War) – but definitely not strong enough to protect against the codebreakers of the 1900’s. The next (and primary) advance of the Enigma machines was its rotor stepping process. When you are about to advance a band, look at whether the letters are grey in the line between the grey bars on the reflector and I/O bands, and
-
- if the letter on the middle rotor is shaded grey, turn all three rotors one step towards you,
- otherwise, if the letter on the right-hand rotor is shaded grey, turn the middle and right-hand rotors one step towards you,
- otherwise, turn just the right-hand rotor one step towards you (this is the normal action).
Now the configuration won’t repeat for 26 * 26 * 26 (= 17,576) steps – much better.
To make sure you get it, here are some rotor position scenarios. When you’re about to rotate, and the rotors are in positions:
- F A V, because V is grey, you would advance both the right-hand and middle rotors toward you, resulting in position F B W
- F E W, because E is gray, you advance all three rotors, resulting in G F X
- G F X, because none of them are grey, only rotate the right-hand rotor, resulting in G F Y
Test your procedure by setting the rotors to A B R, and decrypt the message
M A B E K G Z X S G
Double-stepping
One tweak to the above procedure (which is, so far, just like a car’s odometer), is that if, after you follow the above procedure, the middle rotor’s grey bar enters the start position, then all three rotors step again. I’m not sure if this is critical to the strength of the Enigma, but doing so is critical to compatibility with real Enigma machines.
You can test whether you understand this part by starting in position B F C, and decoding
R Z F O G F Y H P L
Rings – changing the turnover points
The next-to-last feature of the Enigma is that which rotor positions trigger turnover could be adjusted. In the real machine, this was done by removing the rotor and moving a pin from one position to another. In our paper Enigma, it’s done by sliding rings over each of the rotors. Each ring covers up the letters underneath it, and its position determines a different configuration of the machine (is part of the message key). Ring positions are described by the position of the ring’s letter A with respect to the letter it covers. Position 1 means that the ring’s A covers the rotor’s letter A, 2 means A covers B, etc. For convenience, here’s a list of which ring letter A needs to cover for each ring setting.
Setting 1 2 3 4 5 6 7 8 9 10 11 12 13 14 15 16 17 18 19 20 21 22 23 24 25 26
Ring A  A B C D E F G H I J  K  L  M  N  O  P  Q  R  S  T  U  V  W  X  Y  Z
 covers
Test whether you’ve got this by setting ring’s I, II and II to 10, 14 and 21. Then turn the rotors to set the message key (on the rings) to X Y Z and decipher the following message:
- Q K T P E B Z I U K
